Showing posts with label Crafting. Show all posts

Friday, August 31, 2012

Dessert Dishes Project

So I have been seeing on Pinterest different ways to personalize Dollar Tree pottery.  I hopped right on this bandwagon because its a cheap, yet fun craft.  I bought at first 4 plates with the intention of personalizing them with a cursive "L".  They looked pretty bad. so I took some stencils and colored sharpies and went to town.


If you are wondering what happened to the "4" plates, I got a bit carried away and decided that we need at least 20 hors D'oeuvres plates for parties.  And then reality struck and I settled for 12 for myself and two sets of 4 for gifts (I am currently in a holiday gifts making mode).  The first set I had a lot of fun with because I could play with the design a bit.  First I chose the stencil that I thought would look good for the intended recipient.
I then took some of my pretty sharpies and got to coloring.
See how much prettier this is than regular black sharpie?
I did four plates with different bloom colors.
After coloring, I placed them in my oven at 350 degrees for 30 minutes.  While I was waiting for these plates to finish I started on my other plates.  This design was repeated on all 4 plates.
The two sets of 4 above are my gifts to people while the next design I loved so much I am keeping for myself.  At first I wanted to do the design in silver to match my china, thus the 12 dishes I am keeping for myself.
As you can see the silver is not looking too good, so I switched it up to black.
It does look a lot better with the black and this design and much better than the cursive "L" that I tried.  The stencils worked great and I love all the different combinations I can create with the colored sharpies.  They also work great as an inexpensive gift for holidays, birthdays, hostess gifts, etc.


Happy Crafting!
Molly

Knife Block Redo

This is another project that I came across on Pinterest, I swear that site is like crack and I used to play mmorpgs.  This one was pretty easy and quick to do.  Just take your ordinary knife block and paint it, any color.  Here is my standard knife block before.

Don't mind the board it is on, it is my protection for the dinning room table.  Workbench is almost finished, yippee!  I chose one of the sample colors that we have on hand.  It is the same blue that we used in Liam's room.  I it is called Redstone Guest Blue, by Valspar.  We use only Valspar because it works the best for us.  I am sure that any paint will do.
Here are the after shots, like I said pretty easy.  The only difference is that I did not add a monogram or other decal to the block.  I thought that it looked better without one.
And here is the shot with the knives in it.  One of the shears is in the dishwasher at the time the picture was taken.
Since the kitchen is painted a darker blue, I thought that this lighter tone would look good.  Very easy and a quick update to the kitchen.

Happy crafting!
Molly


Thursday, August 23, 2012

Seaglass Project

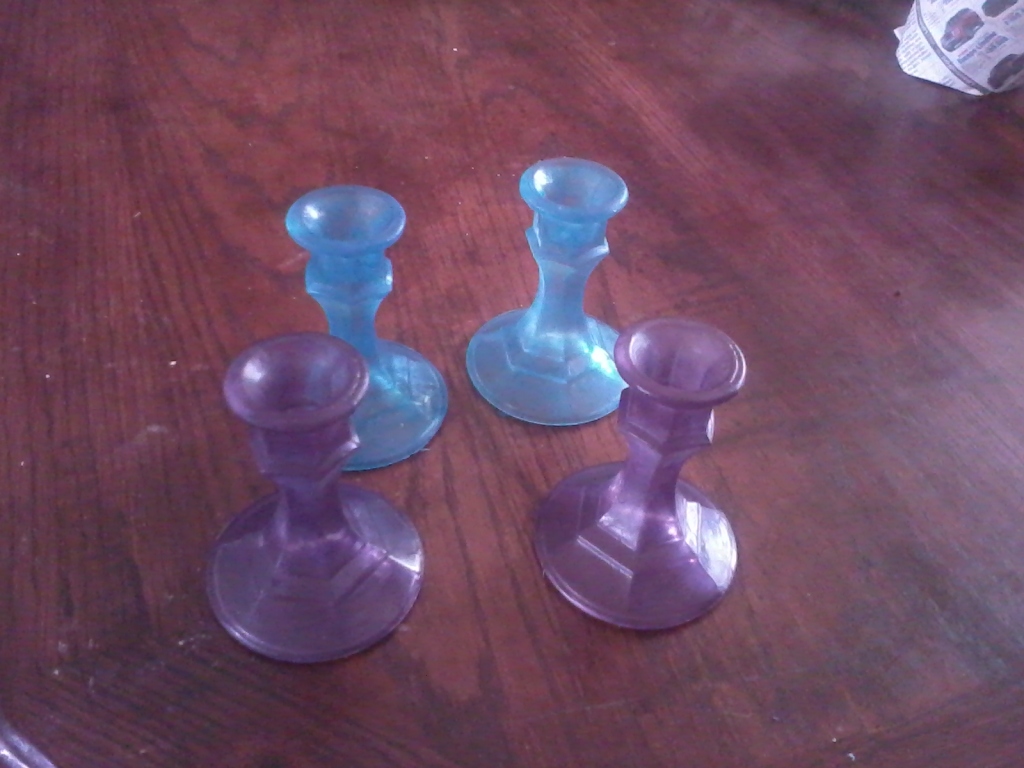
So I saw this project on Pinterest and I thought it looked kind of cool.  I usually tend to stay away from glass projects due to a brother who is a glass artist and puts anyone I know to shame with his artwork.  Yet this was a simple craft that I thought would be fun.  Its very simple, you take glass candlesticks (I bought mine from the dollar store), glue, and food coloring.
You mix the food coloring with the glue to get the colors that you want.  I wanted to try a lilac at first and added a few drops of blue and red until I got the shade I wanted.  I am sure you can do any color imaginable.  Because I am in the holiday present making stage right now I figured I would make them in the colors for the people I had in mind for this project/gifts.

As you can see it is a bit of a deeper lilac, but keep in mind that it will get lighter as it dries.  To paint I used a flat tipped brush and painted on a few coats.

After the candlesticks were painted I let them dry for a few hours.  I liked the project so much that I made two sets.
This could also be a great project for older kids to do for presents during the holiday season.  In total it was $1 per candlestick, $.50 for the glue (you have to love back to school sales), and the food coloring was in my pantry.

Happy Crafting!
Molly


Wednesday, August 22, 2012

Craft Storage Re-do

So a few Christmases ago Josh bought me a white craft storage unit from one of the larger craft store chains.  It has been hidden away with crafting supplies just stuffed into it and then banished to the garage when we moved.  After seeing that I would have to wait a few more weeks before having my crafting haven downstairs, I decided to give it a little pizazz with the contact paper that I bought and some paint.

Here is the before.  I do like the color white, but as an accent.  This was a bit too boring.

First I dismantled the storage cube.
 After I took the cube apart, making sure I marked which screws went where, I laid out all the parts on the table and measured out the contact paper.


I planned on covering the two sides as well as the top of the cube and the front of the storage drawers.  

After laying the contact paper on the larger pieces, I smoothed out all the air bubbles that popped up.  I also made sure to measure out enough contact paper so that I could overlap along the edges so that when it was screwed back together the paper would stay.  Once again, this is contact paper that I bought from the dollar store and I want to make sure that it will stay put.


After the three larger pieces were covered I stared to reassemble the cube.


 Once the cube was put back together it was time to also do the front of the drawers.  At Josh's suggestion I chose to paint the front of the drawers instead of placing the contact paper on them.


Once the paint was dry I reattached the pulls, and reattached the drawer fronts.


Here is the finished storage cube.


As you can see it looks much better.  All it took was some paint and contact paper.  If it wasn't for a whirlwind of chaos named Liam, I would keep this out all the time.  Now I am really looking forward to creating my crafting haven as soon as we get most of the garage cleaned out.


Happy crafting,
Molly


Thursday, August 16, 2012

Bookshelf redo

So, with my passion for history comes a passion for books, a lot of books.  Unfortunately with being the mother of a toddler I have had to hide away most of my books from little hands.  With the addition of the guest room into our lives I have a new place to put my books where Liam cannot get to them.  After a long search for what I wanted bookshelf I went on Pinterest and saw this project; the original project calls for wallpaper, but all the wallpaper that I looked at cost more than the shelves themselves. First I found this great contact paper in a print that I love at the dollar store of all places.  I loved it so much I bought about ten rolls, future projects here I come! Then I went online and purchased two new, smaller bookshelves for $36 after taxes and re-modeled (or re-mollyed) them. 


I attached it to the backing of the bookshelf.


The hardest part of this was getting the pattern centered.  I was a bit OCD at this point with having it match up.


I also made sure to overlap it around the back of the board for better coverage and to make sure that the contact paper would not come loose.


 After the contact paper was on the backing, it was time to build the shelves.  I bought two with the intention of flipping one on top of the other to make one large bookshelf.  When building the second shelf, I turned the top of that shelf upside down because it was going to be screwed into the top if the first shelf.


Once the shelves were built it was time to add the backing.


See the couch in the background?  Told you I loved the pattern.  But it also goes well with the bookshelves.  After I hammered the backing in I brought the first bookshelf into the guest room and put it into position.  I then brought the second shelf in and secured it into the first with basic screws.  I forgot to take pictures of this step, but it is fairly easy to do.  After the bookshelves were screwed together I brought in the removable shelves and the books.


As you can see, the contact paper on the backing adds the touch that it needs.  The bonus of flipping one of the bookshelves upside down creates a top shelf with a bit of molding to place items that may be a bit more fragile behind the molding without the fear of falling off with toddlers around trying to climb the shelf.


This is the semi finished bookshelf.  When I have a bit more time and energy after chasing Liam around, I am going to add some trim to the edges to give it a bit more flavor.  All in all this project cost me around $45 for a custom looking bookshelf with room that was much needed for books.  I may have to do another one since this bookshelf is full already. 

Happy crafting!
Molly


Saturday, July 28, 2012

Wall Sconce Facelift

After moving into the new house, I finally came across my box of home decor.  My wall sconces that I purchased from Target years ago seemed to be out of place.  Looking at them I knew they needed a bit of a facelift.  I took some scrap-booking paper and placed behind the sconces.
It gives it a pop of color that was needed.  Once they had the scrap-booking paper behind it I needed a place to put them.  Voila!  We hung them on the brick going up the stairs to the top floor.
It makes the brick wall stand out even more.  We did have to pre-drill into the brick with a masonry bit and for good measure we put in a wall anchor before the screw.  It is a relatively easy project and makes a big change for a little bit of money.

Happy Crafting!
Molly 

Ottoman Project

Prior to our move I picked up two matching club chairs at a thrift store for less than $10 a piece.  I loved the chairs and so did Josh, even though he referred to them as girly.
As you can see, our wee one, Liam, loves the girly chairs.  The pattern is blue country toile.  There was something missing though, matching ottomans.  The hardest part was finding matching fabric to the chairs.  Thank goodness for Ebay!  The chairs have a accent of blueish gingham and blue cording.  The blue cording I purchased from Jo-Ann fabrics, the lumber, legs and hardware came from Home Depot.  First thing first, I put Josh to work making the frames for the ottomans while I painted the legs to match the legs on the chairs.


The legs were around $2-$3 a piece.  The lumber was less than $15 and the hardware was around $5.  When the frame was done I secured the gingham fabric around the frame with my staple gun.  It overlaps around the edges and I secured them with upholstery tacks to cover up the staples.
After the gingham was attacked, I secured the blue cording to the top with staples.  All it is missing now is the top.  The top was fairly easy as well.  I secured the matching toile fabric to the top with staples, leaving a side unsecured so I could place the stuffing inside.
The top was secured using 90 degree brackets.  And my husband used U-shaped brackets to secure the legs.  Though the fabric is not the same design, you cannot tell unless you really look.  And here is the finished product.
The whole projects cost around $30-$40 all together, including the chairs.  This is why I love shopping at my local thrift stores.  You never know what you will find if you look.

Happy Crafting!
Molly